# Components
So far, you've seen the name anddata options for a component. We will discuss in this section all the others.
# Methods
The methods of the component are declared in the methods property. They can then be called from an expression in the template or from another method of the component with this.myMethod()
<template>
  <button @click="greet">Greet</button>
</template>
<script>
export default {
  data() {
    return {
      name: "Mark"
    };
  },
  methods: {
    greet: function(event) {
      // 'this' refers to the view instance
      this.say("Hi " + this.name);
    },
    say(message) {
      // if a method is independent of the instance (no reference to 'this')
      // it is relevant to outsource it in a separate module
      alert(message + "!");
    }
  }
};
</script>
# Computed and watchers
It is common to want to place within your templates some data that can be directly deduced from other data, or formatted in a certain way. While it is possible to put any JavaScript expression in a directive, a good practice is to limit template complexity and code duplication by declaring computed properties in the component's computed option .
A computed property is a property that can be computed directly and synchronously from other available properties (either props, data or other computed properties). This is similar to a getter, but it is also possible to specify a setter for a computed property. Vue will identify the variables on which a computed property depends to set up the reactivity and update its value when one of its dependencies is mutated.
Vue also lets you declare observers that run some specific code when a property (prop, data, or computed) is mutated. We call this an observed property by a watcher. The observed properties are declared in the watch option of the component.
var vm = new Vue({
  el: "#app",
  data() {
    return {
      count1: 0,
      count2: 0,
      lastUpdate: null
    };
  },
  computed: {
    total() {
      return this.count1 + this.count2;
    }
  },
  watch: {
    total() {
      this.lastUpdate = new Date();
    }
  }
});
To distinguish the use cases of computed vs watcher, we will privilege most often the computed properties whenever possible. A watcher is more appropriate when what interests you in a mutation is not so much the new value, but the moment it occurs; to perform server requests or external actions for example.
# Component Lifecycle
Vue follows a pattern when working with components, from their creation to their destruction through data updates and DOM insertion. Here is the complete diagram :
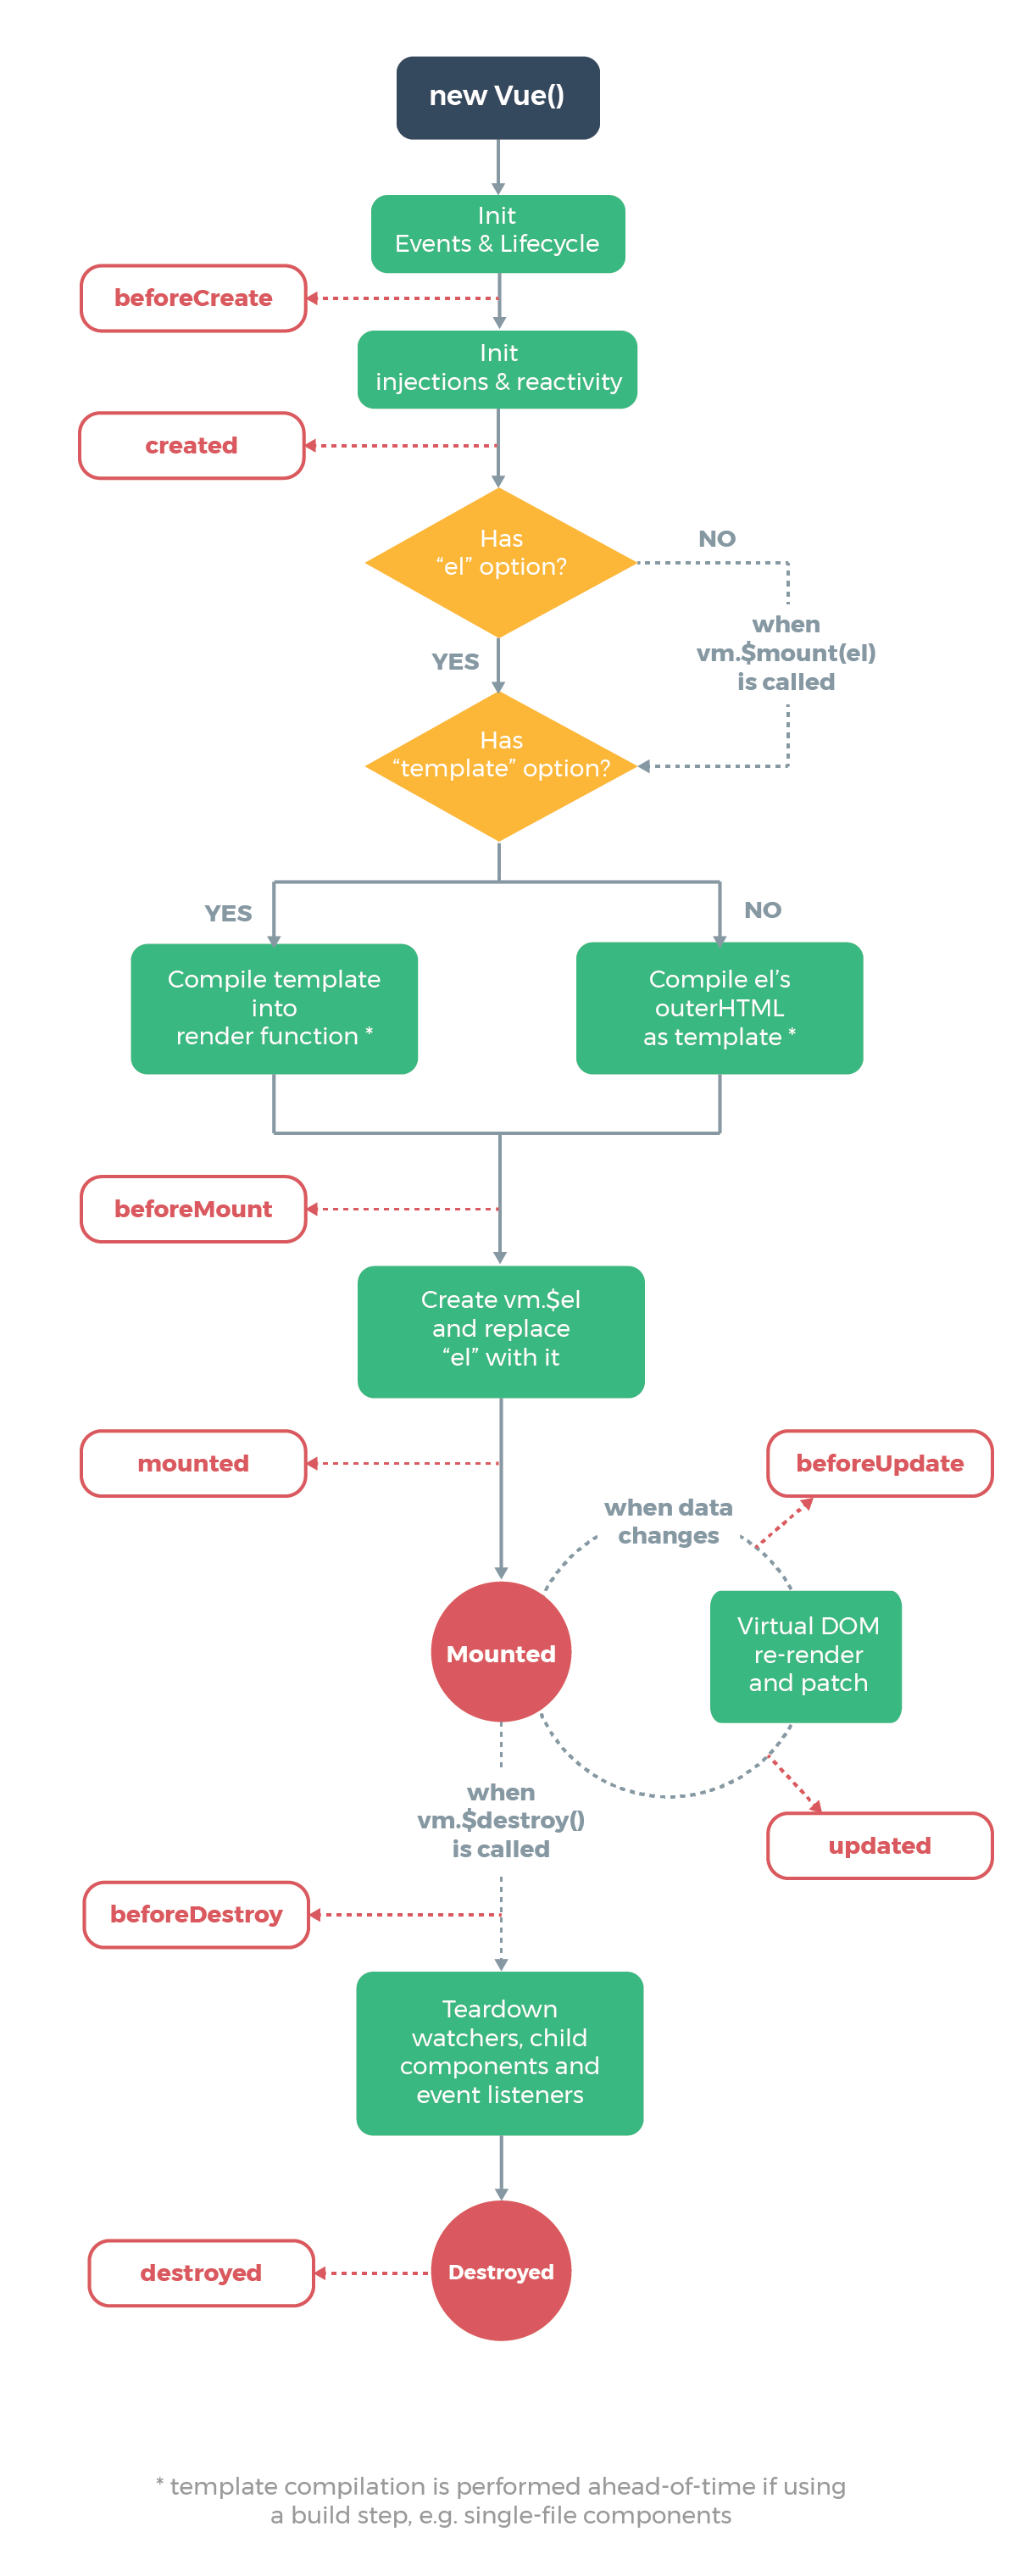
Each stage of the life cycle of a component calls two callback functions, one just before the framework does its internal work, and the other just after. These callbacks can be used to define a specific behavior for the component at these precise moments:
export default {
  mounted() {
    console.log(`This component has been mounted on the DOM,
        this.$el refers to the corresponding DOM element.`);
    this.$el.querySelector("input").focus();
  }
};
Typically, we use created as the equivalent of a constructor function, to initialize certain data or to make some HTTP requests. We use mounted when some initialization steps need to interact with the DOM. Finally, we use destroyed to clean up when the component is no longer used, for example delete global event listeners to avoid memory leaks. Other callbacks are reserved for more specific use cases.
# Communication between components
# Parent to Child communication with props
Like any other HTML element, Vue components can receive arguments, called props or properties. Props are used to convey information from a parent component to a child component.
<my-popin title="Confirm action" :actions="confirmActions"></my-popin>
You must declare the list of accepted properties in the props option of the component. Received props can be used in templates or methods just like properties declared in data. The difference is that we will avoid reassigning or mutating props: since these values come from the parent component, we must rather communicate with this parent (ascending communication) for it to make the change itself. The changed value will then be automatically reported to the child components.
<template>
  <article>
    <h3>{{ title }}</h3>
    <p>{{ content }}</p>
  </article>
</template>

<script>
export default {
  name: "blog-post",
  props: ["title", "content"]
};
</script>
<!-- in parent component template -->
<blog-post :title="article.title" :content="article.content" />
<!-- equivalent shorthand syntax -->
<blog-post v-bind="article" />
Optionally, you can specify the type of props or provide validation options. Vue will reject invalid values for props with explicit error messages, which is useful when using third-party components. For more information on the accepted options, refer to the documentation.
<script>
export default {
  name: "my-account",
  props: {
    propA: Number, // null matches any type
    propB: [String, Number], // multiple valid types
    propC: {
      type: String,
      default: "test"
    },
    propD: {
      required: true,
      validator: value => value.startsWith("_")
    }
  }
};
</script>
# Child to Parent Communication with events
Although a child component can technically access its parent component, it is a bad practice because it induces a tight coupling between the components: the component loses in genericity, it is more difficult to reuse and the risk of infinite loop is higher.
Child components communicate with their parents by using events: they emit events that propagate from parent to parent, in the same way as DOM events like a mouse click. A good component is agnostic of his environment, it does not know his parents and does not know if the events it emets will ever be intercepted (or "listened to").
To emit an event, use the $emit method available in all Vue components. It takes as parameter the name of the event, and optionally a value (payload) to transmit. If you need to pass multiple values, encapsulate them in an object.
To listen to an event emitted by a child component, we use the same v-on directive as for DOM events, or @yourEvent shorthand. The value passed with the event can be retrieved via the $event variable in the directive value.
<template>
  <article>
    <h3>My article</h3>
    <p>Lorem ipsum...</p>

    <textarea v-model="comment" />
    <button @click="sendComment">Comment</button>
  </article>
</template>

<script>
export default {
  name: "blog-post",
  data() {
    return {
      comment: ""
    };
  },
  methods: {
    sendComment() {
      this.$emit("comment", this.comment);
    }
  }
};
</script>
<!-- in a parent component template -->
<blog-post @comment="onNewComment($event)" />
# Slots and Content Distribution
Since Vue components are declared as tags, we can pass them attributes, props, but also place other elements or content inside these tags:
<navigation-link url="/profile">My profile<navigation-link>
The tag content is then placed in a container called the default slot. We can then reinject it in the child component template with <slot> </slot>. In the above example, the slot element will be replaced when rendered by the text "My Profile".
Slots can contain any HTML content, including other Vue components. They are very useful for declaring components that serve as a container rather than content, such as dialog windows or layout elements.
<!-- MyPopin.vue -->
<template>
  <div class="popin">
    <div class="popin-header">
      <slot name="header" />
    </div>

    <main class="popin-content">
      <slot />
    </main>
  </div>
</template>
<!-- in a parent component template -->
<my-popin>
  <h1 slot="header">Popin title</h1>
  <p>Popin content</p>
</my-popin>
In addition to the default slot, you can name certain slots to distribute content to multiple locations, by using the v-slot directive in the content to be placed and the name attribute of the <slot> element to identify the corresponding container.
# Elements References
To retrieve a reference to an element or child component in a template, use the ref directive. Once the component is mounted on the DOM, the element will be accessible via vm.$refs[yourReference].
<p ref="label">My paragraph</p>
<my-child-component ref="child"></my-child-component>
vm.$refs.label; // reference to paragraph element
vm.$refs.child; // reference to MyChildComponent instance
# Complete API of Vue Components
export default {
  name: "MyComponent", // useful for debugging purposes
  components: {}, // declared child components
  mixins: [], // share common features between components
  extends: {}, // create components based on other ones
  props: {}, // properties passed from parent
  data() {}, // component internal state variables
  computed: {}, // computed properties
  watch: {}, // observed properties
  methods: {}, // component own methods
  // component lifecycle hooks
  beforeCreate() {},
  created() {},
  beforeMount() {},
  mounted() {},
  beforeUpdate() {},
  updated() {},
  activated() {},
  deactivated() {},
  beforeDestroy() {},
  destroyed() {},
  errorCaptured() {}
};
# Vue instance properties
TIP
vm is often used as a convention to refer to a Vue component instance
vm.$datavm.$propsvm.$slotsvm.$refsvm.$listenersvm.$options: all the component optionsvm.$el: reference to the root HTML element on which the component is mountedvm.$parent: reference to parent componentvm.$root: reference to root componentvm.$children: array of child components
# Vue instance methods
vm.$watch: declare programmatically a watchervm.$set: assign a property while ensuring reactivityvm.$delete: unassign a property while ensuring reactivityvm.$on: declare programmatically an event listenervm.$once: declare a listener with modifieroncevm.$off: removes an event listenervm.$emit: emets an eventvm.$mount: bind the component to a DOM elementvm.$destroy: destroys the component instancevm.$forceUpdate: force complete update of the component (not recommended)vm.$nextTick: report a function call to next tick in the event loop
# Practical exercise: Decompose our application
- Refactor the existing code by creating a
Film.vuecomponent used to display the details of a film. Addpropsto pass the data from each film to the component. - Create another
SearchFilm.vuecomponent containing a search form and theFilmlist below:
<template>
  <div id="search-film">
    <form>
      <label for="search">Search :</label>
      <input id="search" type="text" />
    </form>

    <ul class="films">
      <!-- list of <Film> -->
    </ul>
  </div>
</template>
- Insert this
SearchFilmcomponent alongsideLoginForminApp.vueand move the data and other associated options in the child components to reduce the size ofAppcode. - Display the
SearchFilmcomponent only if the user is logged in.
Question: In your opinion, what difficulties could you encounter when using the loggedIn variable in more than one component at a time ?
- Assign the
filmsvariable to an empty[]array initially. When submitting the search form, run asearchFilmsmethod that will put the 3 sample films in this list. - Bonus: In the
searchFilmsmethod, instead of putting all the films at once inthis.films, try to assign them one by one in this way:
this.films[0] = { title: 'Titanic', released: '19 Dec 1997', ... }
this.films[1] = { title: 'Blade Runner', ... }
this.films[2] = ...
Question: Why does the view no longer update while the list appears to be filled correctly ?
← Directives Reactivity →