# State management
We saw in the previous section how parent and child components communicate. However, as applications grow and become more complex, components that are far away from each other in the component tree may have to manipulate the same data. It then becomes very tedious to make them share common data references. That's why there are more or less complex state management solutions.
# Why a state management solution ?
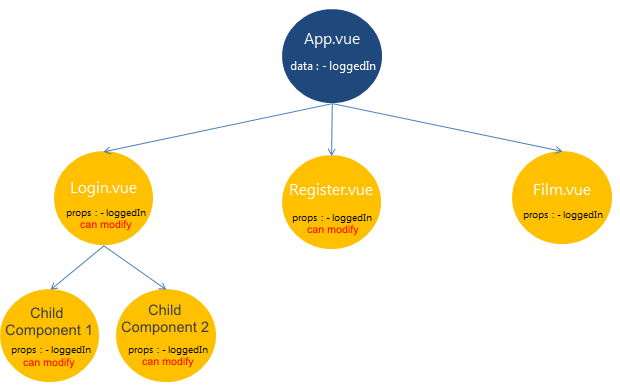
- because propagating some data ad
propsof a parent component to the grandchildren and great-grandchildren components quickly becomes tedious - to be able to share information between different component trees
- to delegate data management to a service reachable from all components
- to be able to persist the data automatically (in
localStoragefor example) - to log application states, or rollback to a previous state with a Cancel feature
- to help debug, log, monitor or send error reports
# Data shared by reference
The simplest solution to the state management problem is to store the data within one or more objects declared in their own module. All components that want to manipulate this data can then import the object and modify its content while working on the same reference.
/** services/state.js **/
export const state = {
  user: null,
  loggedIn: false
};
/** LoginForm.vue **/
import state from "services/state.js"

export default {
  data: { state },
  methods: {
      login(){
          this.state.user = "John Smith"
          this.state.loggedIn = true
      }
  }
})
TIP
Note that we have intentionally declared data as an object and not a function, so that instances of the component use the same shared data reference.
However, we can also mix local data and shared data:
data(){
  return {
    sharedState: state,
    privateState: { ... }
  }
}
This solution can do the job in many cases, but quickly shows its limitations when debugging with many different components interacting with the same data at the same time. Indeed, mutations of state objects are not logged anywhere, so it is difficult to find the origin of a bug.
# Store and controled mutations
A slightly more advanced pattern is to declare a store object that encapsulates the state object and serves as a control interface. The state object is not directly reachable from the outside by reference, but the store provides methods to interact with: typically a getter / setter. We can then add in these methods other features for debugging, monitoring, performance measurement etc.
/** services/store.js **/
const state = { message: "hello" }; // no export for state

export const store = {
  get(prop) {
    if (DEBUG_MODE) console.log("[store] get", prop);
    return state[prop];
  },
  set(prop, value) {
    if (DEBUG_MODE) console.log("[store] set", prop);
    state[prop] = value;
  }
};
<!-- MyComponent.vue -->
<script>
import store from "@/services/store.js";

export default {
  data() {
    return {
      privateState: {},
      store
    };
  },
  computed: {
    message() {
      return this.store.get("message");
    }
  },
  methods: {
    exit() {
      this.store.set("message", "bye!");
    }
  }
};
</script>
# Vuex
Once you have a store pattern, it is tempting to enrich it with many features and take advantage of the centralization of state mutations. This has been a field of research for many development teams, especially outside Vue ecosystem, for example the work on the Flux architecture done by the React team.
Vuex is the culmination of this centralized store pattern. It is official state management solution provided by the Vue team. Vuex will not necessarily find its place in all Vue projects, but it is a very efficient tool in large applications that handle a lot of data.
Vuex works with the following principles:
- A mutation is a function that mutates the state of the store. It must be synchronous.
- An action is a function that triggers one or more mutations. It can be asynchronous.
- Components modify the application state by invoking actions
- The mutated state updates reactively all the views that use it, regardless of their depth in the component tree

# Practical work: Implement a Vuex store
- Install
vuexandvuex-persistedstatedependencies that will be used to persist store state.
npm install vuex vuex-persistedstate
- Create a Vuex store by creating a
src/store.jsfile with following content:
import Vue from "vue";
import Vuex from "vuex";
import createPersistedState from "vuex-persistedstate";

Vue.use(Vuex);

export default new Vuex.Store({
  strict: true,
  plugins: [createPersistedState()],
  state: {
    user: null,
    loggedIn: false
  },
  mutations: {
    setLoggedIn(state, loggedIn) {
      state.loggedIn = loggedIn;
    },
    setUser(state, user) {
      state.user = user;
    }
  },
  actions: {
    login({ commit }, { user }) {
      commit("setLoggedIn", true);
      commit("setUser", user);
    }
  }
});
WARNING
The strict mode is used to throw an error if the Vuex store state is changed without using declared mutations. Warning, this mode is expensive in performance and must be deactivated in production!
- Declare the store in your application by completing the
main.jsfile like this:
import store from "@/store";

new Vue({
  render: h => h(App),
  store
}).$mount("#app");
- In the application code, delete the prop
loggedInpassed from component to component and retrieve this property from the store instead (this.$store.state.loggedIn)
TIP
The mapState utility provided with Vuex can be used to shorten the code by easily linking store data to a computed component property
import { mapState } from "vuex";

export default {
  computed: {
    // bind this.loggedIn to this.$store.state.loggedIn
    ...mapState(["loggedIn"])
  }
};
- In
LoginForm.vue, on form submit, check if the user has entered the email addresstest@test.comand the passwordtest1234. If so, trigger theloginaction for the usertest.
TIP
Invoking an action from a component is done like this:
this.$store.dispatch("login", { user: "John Smith" });
- Login with the identifiers mentioned above, check that the navigation to the search form is working properly, then refresh the page.
Question: Why do not we return to the login form after refreshing the page ?
If the user has entered wrong credentials in the login form, display an error message. To help you, you can declare additional
datasuch as aloginErrorstring for example.Bonus: Code a
logoutaction and add a logout button<button id="logout-btn">that invokes this action. Display the user's name next to this button.
← Reactivity Routing →